


How to Move a High Tunnel in 13 Easy Steps
Moving day for Valhalla

The Genuine Faux Farm features two high tunnel buildings. They are not exactly greenhouses. Instead, they are hoop buildings where we use heat gain and retention from the clear plastic covering to extend our season for crops grown in the ground. We have named the smaller of the two buildings (72' x 30') Eden and the larger (96' x 30') is called Valhalla.
Both high tunnels on our farm are built on tracks that allow us to move them between two different positions. Our main purposes for the movable buildings are soil health and pathogen control. A stationary building results in salt buildup from irrigation while pests and diseases are harder to control with limited rotations and no freeze/thaw cycle.
Moving Valhalla
We neglected to take many pictures during this year’s move, but we are fortunate that we have several images from 2019. Since we often get questions about our movable high tunnels, I thought people might enjoy a summary of the moving process. In 2019, we moved the high tunnel in the same direction that we moved it this season - from West to East.

The 2019 move was a Spring move. We started crops in Valhalla that we wanted to finish outdoors. Typically these might be things that would struggle if they were left in the warmer building. Our goal was to then plant crops that needed protection from cooler nights and that would thrive in a high tunnel for the rest of the season. This allows us to harvest Summer crops well into October.

We used our power harrow to prepare the soil prior to moving the building in 2019. Conditions were dry at the time, so we were not too worried about our tractor getting stuck when we used it to move the building. In 2025, we used the rotary harrow for all but the center pass. This provided us with a path that wasn’t as soft and that had plant material to keep us from getting stuck if things were wetter.
Our 2019 move was completed by the two of us (Rob and Tammy) on a Saturday morning. We had some help from Elsie and Carter in 2025 and the process was spread over a few days.
Step 1, clear the tracks
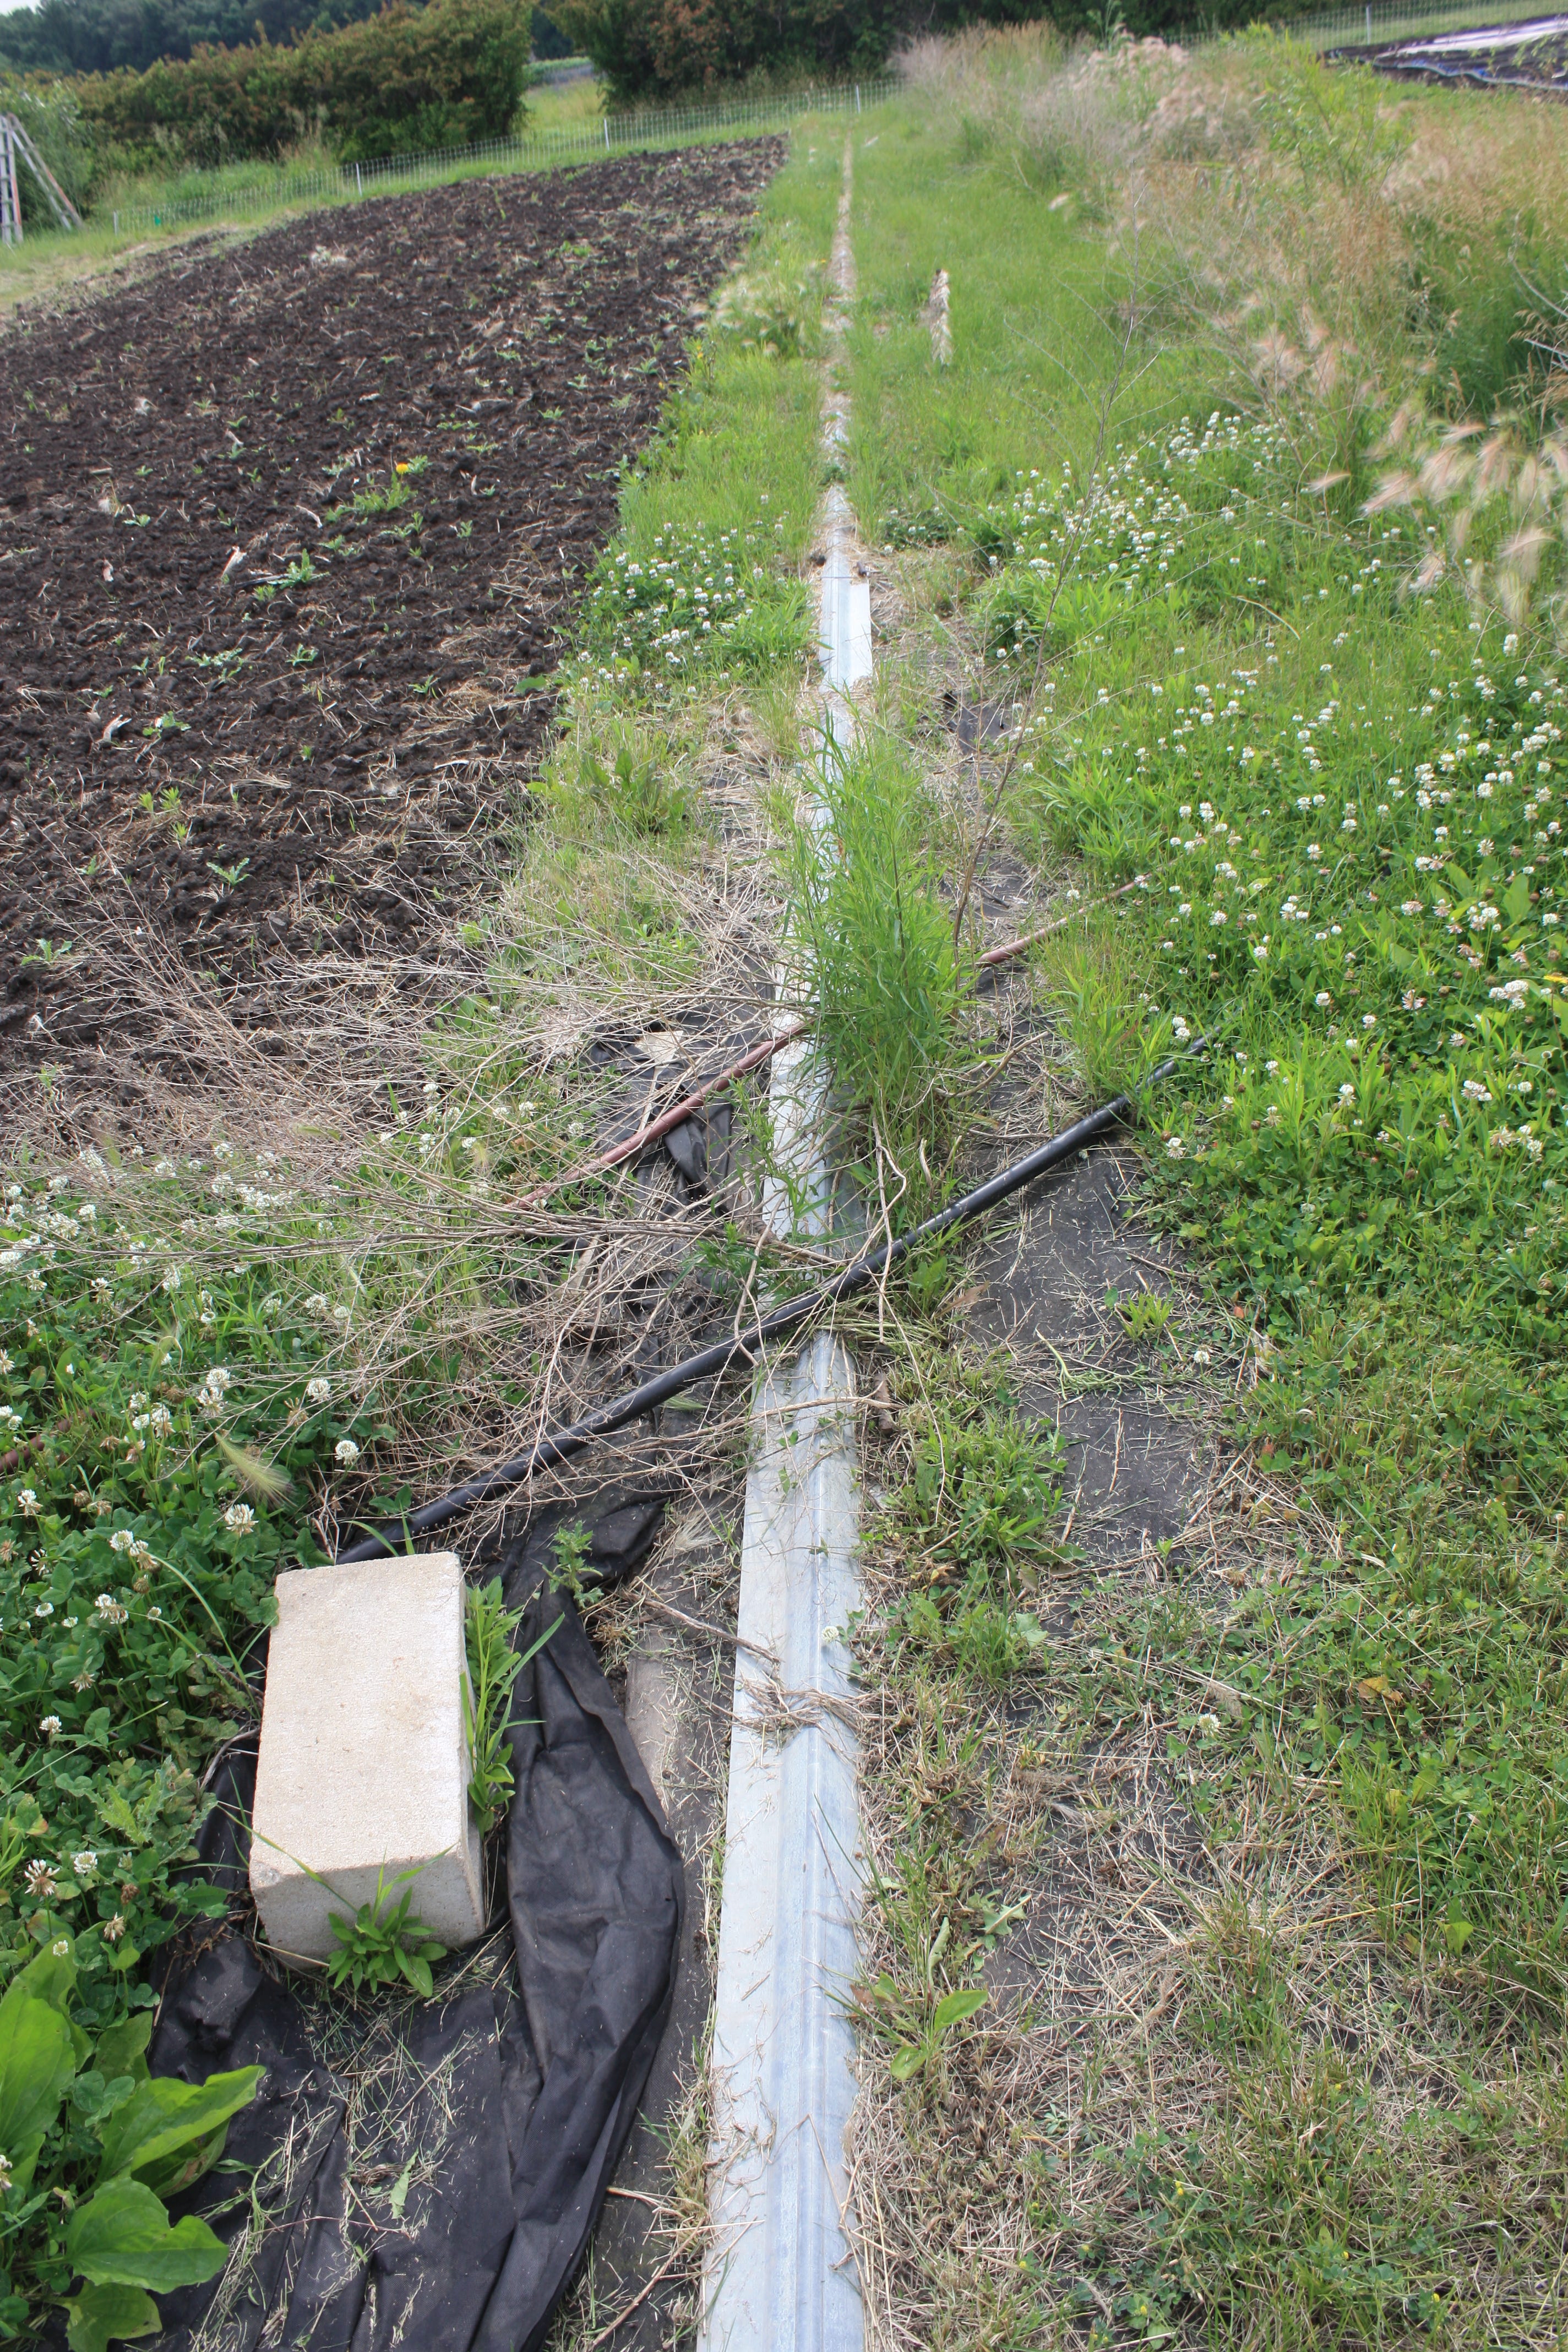
The high tunnel is built a bit like a train. There are two ridged tracks that run parallel to each other on the ground. The “feet” of the high tunnel have grooved metal wheels that rest on these tracks. In order for this to work, we have to clear those tracks of all obstacles.
Over the course of a season (or more), grasses, clover and other plants begin to encroach on the track. Dirt may shift onto the track. And, other objects, like a water lines or hoses (as shown above) need to be removed. The hardest part is the process of removing the newly forming sod that always seems to be forming on the edges of these buildings. I am guessing we might benefit from a power edger, but we have yet to take that leap. Sometimes it’s hard to justify a tool that will get used once a year at most.
The track is anchored to the ground by t-bar stakes. Over time, these will move, often causing the t-bar to lift up and become obstructions to the wheels. This is where we get some solid forearm workouts as we take a 3-pound hammer and persuade each of these t-bar stakes back into their desired positions.
Now, before you think we are done with this process when we clean the track in the area where the building is going, let me remind you that there is also track where the building is currently stationed!
That track ALSO needs to be cleared of obtacles. This portion has the added challenge of the building serving as an obstacle. I have found that it is impossible to drive in some of the t-bars with one 3-pound hammer. Instead, I need two. One of them is held on top of the t-bar and the second is used to hit that hammer. The force is transfered to the head of one hammer to the next, effectively driving the t-bar in.
The good news about this part of the project is that it can occur in the days leading up to the actual move. The bad news is - the longer the time span between moves, the harder it is to prepare the track!

Step 2 - roll up the sides and free up the apron
We roll the sides of the building up in the morning most days from Spring to Fall and down most nights. So this is barely worth mentioning. Still - it’s a thing. On the other hand, clearing the apron is not a normal farm chore.
The apron is a long strip of plastic that connects to the baseboard and extends to the ground. Its purpose is to keep unwanted varmints from crawling under the baseboard and into the high tunnel. Farmers Rob and Tammy are not fond of varmints snacking on the high tunnel crops!
We have all kinds of high tech methods for keeping the plastic down. I sometimes wonder how technical we should get on our blog, so I am hesitating telling you about this part.

Oh, ok. It's just some t-posts.
It doesn’t matter what technology we wanted to use to hold the plastic down, we have to remove it so the building can move freely. It’s not a hard project, but picking up and moving items weighing down plastic over 192’ of real estate isn’t a trivial effort. Remember, these will all have to be transported to the new high tunnel position so they can be put back ON the skirt once the building is moved.
We solved this problem in 2025 by not yet having installed the apron plastic after our plastic recovering project. It’s not a solution, really. Because now we really do need to go install that skirt!
Now that we are no longer mystifying everyone with our clever ideas and techniques, we shall now discuss wind. Lots of wind. And the things wind can do to our high tunnels.

Step 3 - put the wheels BACK on the track
Both high tunnels have multiple attachments to the ground to keep it from getting away. Even so, strong winds can move the building off of the track enough that we have to put those wheels back on the track before we move the building. We typically use a sturdy board as a lever to put these sections back.
We frequently forget (though you think we would learn) that we need to loosen any of the turnbuckles that hold the building before we try to put the building back on the track. These turnbuckles do their job and hold the building in place. They can be very effective at resisting our attempts to move the wall.
Sometimes, we will move this step to the point AFTER the turnbuckles are loosened for the move (step 10 or 11). But, it’s actually a better policy to check the status of the high tunnel regularly and correct this sort of problem as it occurs.

Step 4 - admire the crops currently in the building and check the weather
In 2019, we had our second succession of greens, some peas and a few other things inside the building. Most of these crops would not have benefited from being inside the high tunnel for much longer. So, it was a good time to get them out of the building.
Since plants don’t easily move from place to place, we move the building. I tried looking into a plant-hearding dog (or cat) but it seems no one is into training those animals to do that particular task.
Once we are done admiring the crops, we begin the process that we cannot stop UNTIL the building is in its new position. Door removal and disconnecting the building from its anchors commits us to the move process.
So this is usually a good time to check the weather! If it looks like a storm is coming, do what you normally do to prepare for it and wait until it passes to continue.

Step 5 - take the doors off of each end
Valhalla has an entry door on each end wall. Both of these doors need to come off before we move the building. So, we push the pins in the hinges out and move the door out of the way.
A pro-tip for those of you who want it (clearly I don’t because I often neglect to do this): Move the door to its new location at the point you remove the door. This is usually done early in the day and you have more energy to lug one of these doors a hundred feet (or so) then.
One year, I had the brilliant idea that I would leave one door where it was (in this case it would have been the East door). Then I moved the other door (the West door) the full length with a tractor bucket/loader. I ended up moving BOTH doors at the end of the day because the hinges were not placed in the same locations for both doors.
So… don’t do that.
Aren’t you glad I’m willing to share my bad ideas?

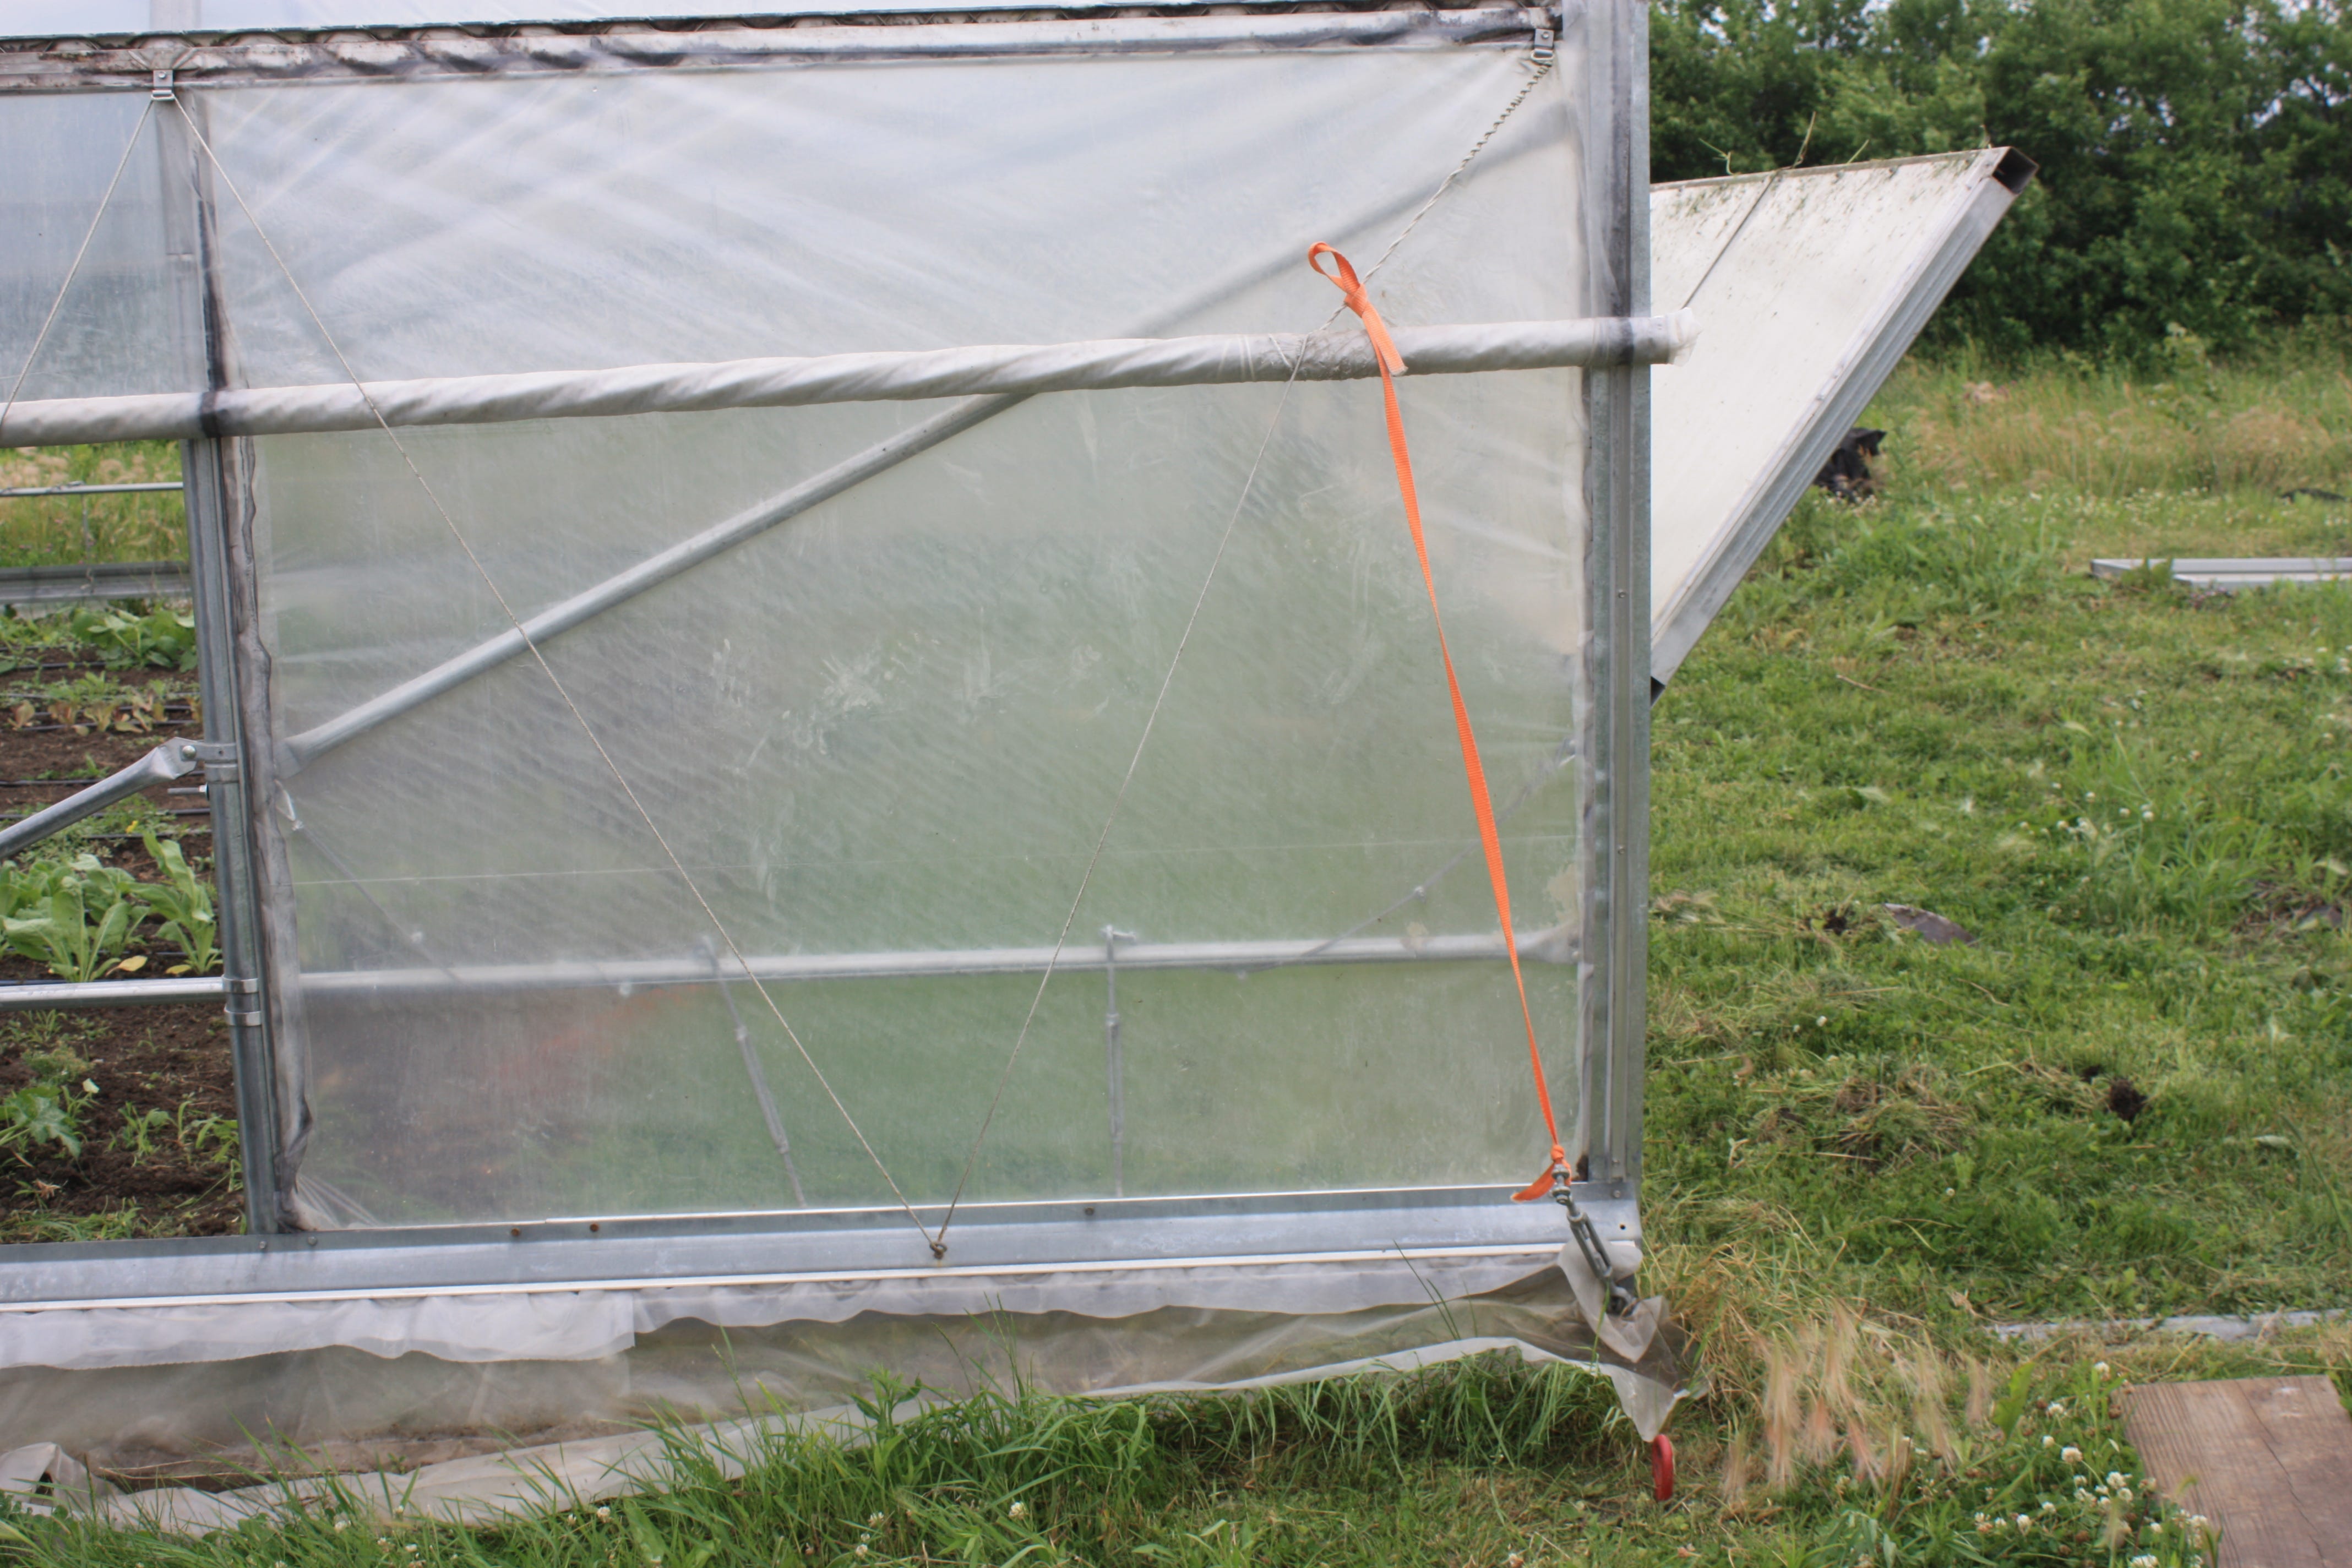
Step 6 - remove the T-Posts that secure the end walls
If you look at the image above, you might notice that we have t-posts lined up at each vertical of the end wall. These t-posts help provide rigidity and an attachment to the ground for one of the weakest points of the building.
These posts are attached by some U-brackets to the end walls and we remove the tek screws that hold them in place with an impact driver. Then we pull the t-posts out and remove them from the building.
Once again, they will need to be moved to the new location. The good news is that they, unlike the doors, are interchangeable. You can either move one set of them 200 feet or two sets 100 feet each. Whatever makes you happiest.
A quick note: if you are absolutely positive there will be no strong winds, you could get away with stopping the process here for a while (overnight for example) if you had to. We did this in 2025 successfully so we could get our help in place.

Step 7 - take bolts out of end wall and end wall flap
This is usually the step where one of us trudges back to the garage to get the socket set that we didn't bring out with us.
Also, if I’m having a bad day and not thinking as well as I should, I will forget that I need to use a “deep” socket for the lower nut.
The hardest part here is that these holes don’t always line up perfectly and it is possible that the bolt has bent over the course of the season. End walls on high tunnels can catch a LOT of wind that will put stress on the bolts (and other connectors). I have not (yet) had to resort to a grinder or other cutting tool to remove these bolts. But I could see the potential for a scenario where I would have to.

Step 8 - take the poly-carbonate cover off the corners over the tracks
We attach a small piece of polycarbonate paneling over the hole that exists between the end-wall flap and the corner riser. If left uncovered (or if this piece blows off in a storm) we have discovered that we get visitors in our high tunnel that we do not want. In particular, rabbits are fond of our early Winter greens.
But, before we raise the flaps these extensions need to come off.

Step 9 - dig out the flaps, tie them up, nest the roll up bars
We throw some dirt in front of the outside (and inside) of the flaps to help hold them in place. But, that means we have to dig that back out when we want to raise the flaps.
After a year or two of a building being in place, this often becomes another opportunity for vigorous exercise. If you feel a need for that exercise, have at it! If not, do it anyway.
We tie the flaps up with rope to the header above the doorway. We loosen the polycarb on the lower inside corner of each flap so we can pass the rope through and attach it to the flap’s frame.
Once these are tied up, we can rotate the roll up handles to rest inside of the cradle that is formed by the end wall flaps.

Step 10 - disconnect the building from the track
The track is connected to the ground by t-bars and the building is connected to the track by a series of turnbuckle, wire and c-connector attachments. Each turnbuckle must be loosened and then the c-connector must be opened so the entire connector can be looped up and over the hip board (see below).

I like to loop these connectors around the hip board (or bar) twice to make sure it does not drag or get caught on anything as we move the building. If one of these should get caught, it will stop the building from moving and will likely end up bending up the connector or some other part of the structure.
Don’t ask me how I know that.
Another good idea is to close the c-connectors so they don’t fall off of the turnbuckle during transit. It can be very frustrating pacing around the track looking for one of these at the end of the move.
I would also prefer that you not ask me how I know that one too.
You might also notice a weed whip in this image. While I haven’t given this a step, it’s usually a good idea to knock grasses down around the outside of the tracks (both positions) before you move the building. It helps when you forget to close up the c-connectors.
Step 11 - disconnect the building from the ground anchors
We save this one for last usually because these anchors could probably hold the building in place if a freak poof of wind should come along at this point. The idea is to have the building unsecured for the briefest amount of time possible.
Once again, turnbuckles are used to connect the building to ground anchors at uniform points on both sides of the building. Once we disconnect the turnbuckles we either tie them up using twine or some other item to keep them from dragging and possibly jamming up the works during the move. We have also successfully used duct tape to hold them in place.
Step 12 - inspect everything one more time and MOVE IT!
Seriously. This is an important part. Do it.
THEN, HEY PRESTO! Your building is moved.

See?!?
I suspect many of you are now suspicious that I was tired of typing all of this out and I took a short-cut there. No, that's not true. At this point moving the building is pure magic. We say the magic words.
"Please, Valhalla, will you move to the Eastern position that we have meticulously prepared for you?"
Okay! Okay! I admit it. There IS more to it than that. But, we’re usually so busy at this stage that we have no images during that phase. So, I can pretend that it was magic.
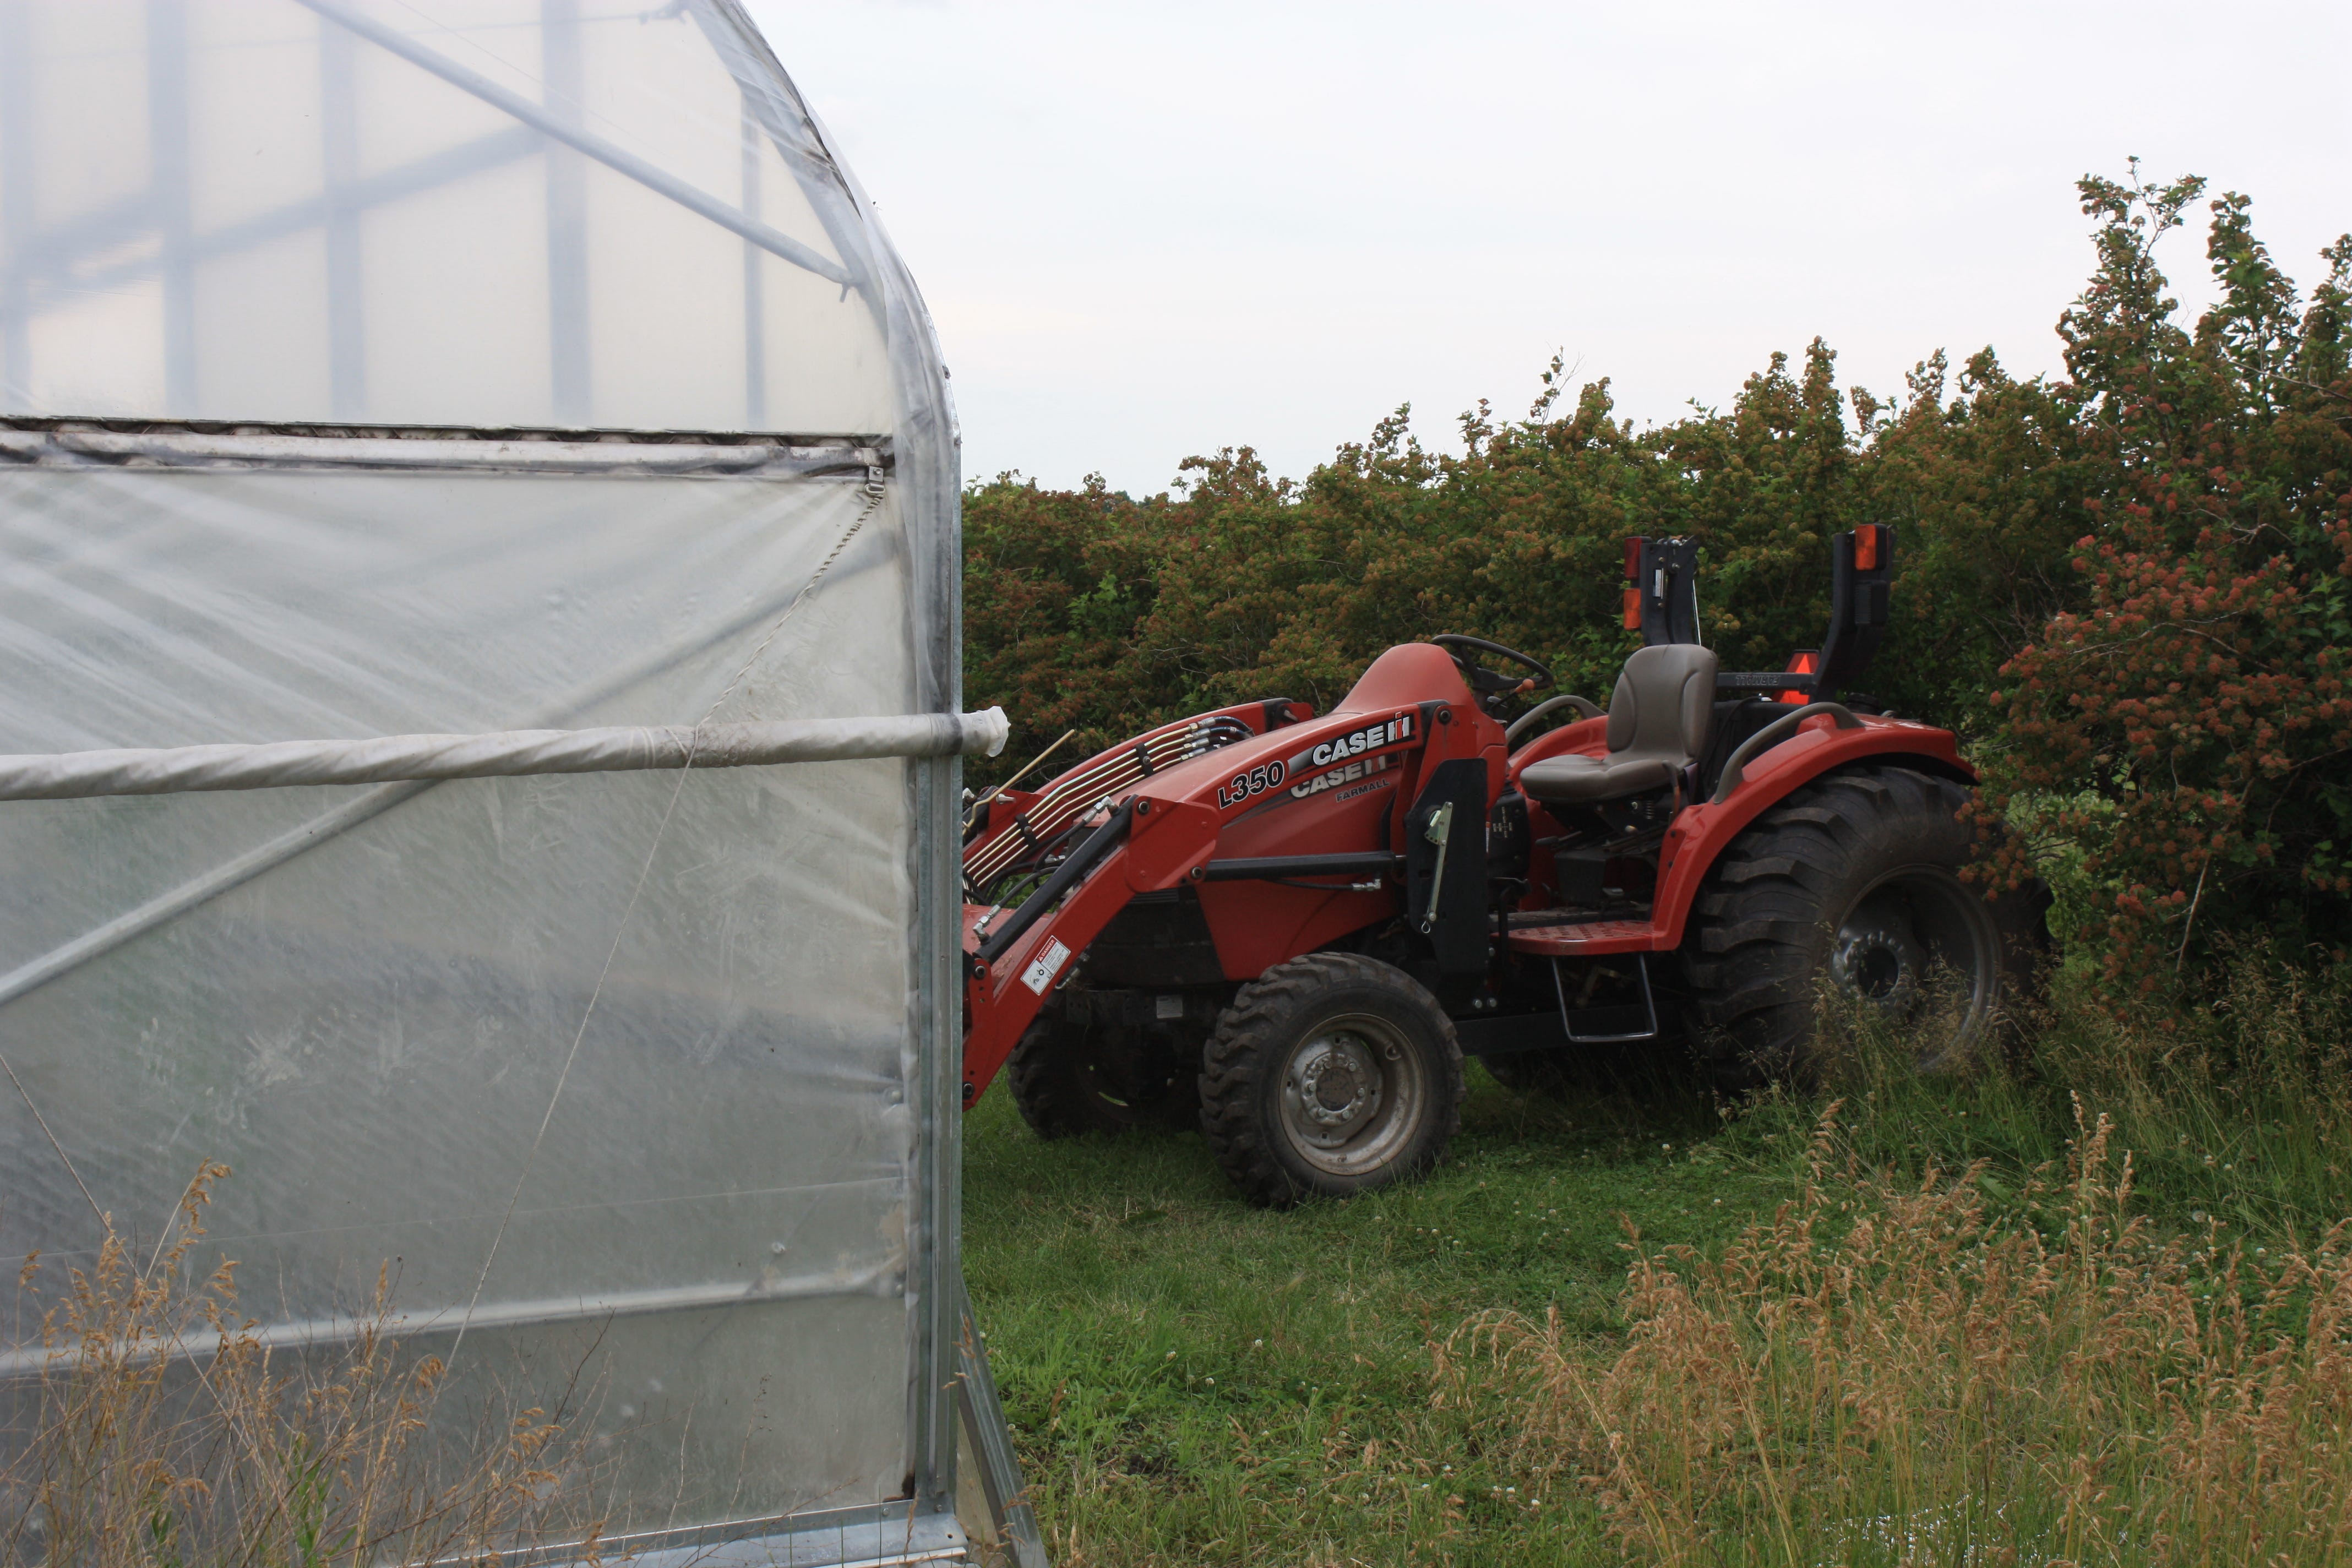
We use a long, sturdy rope to connect the building to Rosie (our tractor). I prefer to have the rope about level with the hip bar and we run it around the third verticle on each side before tying it off at the second verticle. We make sure that the rope is inside the rope that keeps the roll up sides contained. I feel like this set up reduces stress on the building as it is moved.
We put the tractor into a low and slow gear and back it up until we get to the new spot. Meanwhile, it helps immensely to have one to three other people monitoring progress. One person should be in charge of communicating with the driver of the tractor so they know when to start and stop.
However, I will say that I’ve moved Eden, our smaller high tunnel, by myself in the past.
Most moves require a few stops as the building may slip off the track or get jammed up on debris on the track (even if you think you’ve cleaned it well enough). We are hyper aware of anything that might be binding up and we err on the side of caution by pausing to inspect progress and addressing issues as they arise.
Step 13 - do steps 5 through 11 in reverse order
The temptation at this point is to celebrate and go eat lunch, or some such thing. But, the building is still not secured. So, we need to reattach the turnbuckles to ground stakes and the track and it is a very good idea to at least put the flaps down before you have a sandwich.
And there you have it. How to move a high tunnel in thirteen easy(?) steps!
Have a good day everyone!
As always, the concept of a moveable tunnel is wonderful, the reality seems to be another story. Whew! It's like so many tasks these days: the 4-minute YouTube video only shows step #12 - the actual moving - and glosses over steps #1-11 and #13. Life is seldom that simple, as we've all learned. Thanks, Rob, for continuing to let us know what hard work you do to make good food. Now, if more of us could extrapolate and realize that this is probably true for everyone who performs well any worthwhile task.
They are noisy and smelly, but Mantis tillers can be set up to do edging, and also with the wire brush attachment on one side, also crack (or maybe track!) cleaning. If there is a battery-electric version of the Mantis out there - that might be a lot nicer.
This might seem wasteful, but for jobs requiring a number of certain and specific tools, I often invested in a set of them just for the task at hand and put them either in their own cloth tool bag, or their own tool box. "Tunnel Tools for Moving" or something like that. Often saves a lot of steps, time, and maybe even a little frustration. You just have to resist the temptation of borrowing tools out of THAT set and not returning them! (??)
Thanks for sharing this Rob! It had just enough "railroading" in it to really hold my interest!! 😉